Category: Internet Security

What is Internet Privacy and How to Protect Yourself

What Is Internet Privacy

We share our details whenever using the internet without knowing it: websites track our geolocation, credit card or phone numbers, search, and purchase histories. Imagine what would happen if frauds will get such data! We will tell you why you must disable third party cookies or install reliable antivirus.

Most of all social connections take place on the Internet. We chat with friends, publish photos, or look for new sneakers. So if it matters for you that your correspondence and private files don’t leak into the public domain, then you should think about privacy issues.

What’s so special about Internet privacy?

Privacy on the Internet reflects in which way the site or company gathers and stores our data, and how they transfer or sell it. Based on received data, they form a broad customer base, that includes details such as telephone number, home address, or even clothing preferences.

Why we should care about such things as privacy on the Internet? Data leakages may result in stealing money from our credit card, appearing of annoying ads that are based on our purchase history, and receiving tons of spam emails.

Here’s some advice on how you may protect your privacy. They’re really simple, so both children and adults will manage to use them.

You can secure your details by such means:

1. Disable tracking cookies

If you want to prevent websites from monitoring your activity, you need to block third party cookies. It will help you deal with annoying ads, formed by your search history, and prevent your confidential data leakages. Here’s a guide that explains how easily block cookies in any browser.

2. Use a VPN

Another way to protect your info is to download and turn on a VPN. The major benefit of this method is that your data remains encrypted. Even your ISP won’t be able to find out which pages you’ve visited. A VPN allows you to visit blocked sites and bypass filters on work or school computers. We suggest taking a look on top free VPNs.

3. Don’t share your private details with suspicious websites

 If you find yourself on a suspicious site that asks you to enter private data, credit card numbers, or other intimate details, be extremely careful! These websites preserve data, create huge databases, and sell them to advertising companies. Therefore, we recommend you think twice whether a coupon for a free burger or participation in suspicious sweepstakes is worth intimate information leakage.

4. Turn on the private browsing mode

If you turn on the private browsing mode, you prohibit websites to gather and preserve your actions and data. On the contrary, this method won’t give full protection. ISP, smart tracking, and websites will still see your private data. This guide explains how to turn on private browsing mode.

 5. Set up a verified antivirus

Antivirus is a great helpmate when we talk about data security. Top antiviruses suggest such services as web protection, antispam, online payment’s security, and parental control. Scammers can steal people’s intimate files to extort money in exchange for deleting stolen data. However, if you have installed antivirus, no one will get your sensitive files, correspondence, and photos. Here you can find a list of the top reliable antivirus programs.

If you are concerned about the security of your private details, you can avoid scammers, stealing money from credit cards, or annoying spam. With our tips, you will easily maintain confidentiality at the right level. Just remember to be extremely cautious during an Internet session, and your data will be safe.  

9 Proven Ways To Enhance Your Email Privacy!

Share This Article

How to Delete Search Bar History

how to delete search bar history

So you searched for a word or phrase and noticed it appears in the drop down history every time you go to the search bar to search for a new term. Would you like to learn how to delete all those words and phrases anytime you wish? The method to delete search bar history is different for every browser.

Here, we’ll review the various steps needed no matter what browser you are using to conduct your Google searches. Often parents contact us after testing our kids search engine for certain words. They want to ensure our Google enhanced search bar works to protect kids. They are happy when inappropriate search terms are blocked, but now those same words and phrases show up when clicking the search bar.

Clearing Google Search

This issue is not something only related to our website. It’s what happens on any search engine bar in any browser. You may have noticed that your email address will show up in certain forms on your computer as well. Well, there are ways to remove any dropdown term you wish showing up on any form, including our safe search resources.

The solution is to finding the proper instructions to delete your recent searches depends on your web browser. It’s not as simple as just clearing the history because these terms showing up are related to forms on your operating system.

Now for the good news! Below are the steps you need to take to remove form history in Chrome, Microsoft Edge and Firefox browsers.

How to Delete Search Bar history on Chrome

When the drop-down list of suggestions appear, you can highlight an entry by pressing the down arrow key. Then press “Shift-Delete” to remove the highlighted entry from the list. This is the simple way to only remove specific words or phrases.

To do a more extensive removal of all terms you can do so by going to your Chrome browser history, which will provide various option related to all types of history in Chrome.

How to Remove Search History in Microsoft Edge

To delete search bar history from Edge press Ctrl-H on your computer. Then click “Clear History” in the top right. A menu will open to reveal a number of options. If you only wish to delete the search bar history, only select the Autofill Data box. This will remove all words and phrases that were entered.

In Microsoft Edge you can also select to always clear anything thing that is checked off when the browser is closed. The ON button for this is located below the menu and applies to all boxes that a checked off.

Deleting Search Bar History in Firefox

The Firefox browser provides the easiest way to delete searches from any form or a search engine such as ours. Simply click on the search bar and when the word appears click it and hold it, but don’t let go. Then click the delete key. This will allow you to delete only specific searches in the dropdown.

To conduct a blanket delete of history in Firefox, look for the menu links in the top right corner of the browser. Select Tools => Options => Privacy and Security. Then scroll down and click Clear History. To delete the history of searches made, you will need to select Form and Search History. Here you decide whether to check or uncheck other items to may or may not want deleted. Firefox also allows you to delete Everything => or the Last Hour => last Two Hours => last Four hours => or Today only. Firefox has the most options when deleting various history variables.

Having Trouble Deleting Searches?

At Safe Search Kids, we understand that parents and teachers in schools are looking for filtered search engines they can trust to block content that is harmful to kids. You may enter the worst of the worst terms to ensure nothing bad shows up. So if you are having trouble with these instructions, please feel free to contact us for further clarification.

Short of installing parental control apps and taking steps to turn on safe search, Safe Search Kids is a good first step towards protecting kids online. So thanks for testing us out. We hope our search engine can be of use. Our Google enhanced search engine provides safe search of the web, safe images, kids Wikipedia and safe videos for use in your home and in the classroom.

Reading to Learn More:

Share This Article

How To Keep Your Kids From Malware

Keeping Kids from Malware

Most parents can easily come up with a list of potentially harmful elements on the Internet that their kids could be exposed to. But as long as that list gets, most will not even think about malware. Precautions to block certain content from causing lasting damage in young minds includes making sure malicious software (malware) does not invade our child’s privacy.

Malware can secretly infect any computer through infected websites, bad software, music and movie file sharing sites and even seemingly innocent online video games. It can expose kids to harmful materiel and at the very least reek havoc on computer. And like any type of virus, it can spread to other computers.

In this article, we’ve collated some of the best ways to take measures regarding Internet security and privacy in order to keep your children’s browsing and gaming safe. Most of these precautionary measures include having an open dialogue with kids about the unseen dangers of malware. Additionally, software solutions a necessary.

Get an Anti-Malware Program

An anti-malware program will save you from future headaches. It protects your browsing and gaming from unwanted viruses and malware; an effective anti-malware program will keep the Trojan virus away. Trojan viruses are a class of code or app that seems to be innocuous when downloaded, but once it’s part of your computer system it goes to work to cause mayhem.

Malware protection blankets your computer against most threats, including Trojan horses which even top of the line antivirus systems do not have. It does it’s best to block “suspect” programs, as well as conducts daily scans to subsequently removes threats that are attempting to change the way your computer behaves.

Google “Malwabytes free download” so do a free scan of your computer.  If data and privacy is compromised due to a scammer, it can also block a brute force attack.  

Setup Digital Boundary rules

This is where effective communication comes through. Setting up digital boundary rules with your children is fundamental in making them understand that while the Internet is a great place to obtain information, play games, and communicate with their friends, it can also be a dangerous place for someone vulnerable.

Talk to them about rules that you’ve decided upon, or better yet, allow them to participate in the decision-making process. For example, ask them what their stance on no Internet or gadgets after a certain time on weekdays. If you prefer they go to bed before 10:30 PM, it’s wise to set up no Internet by 9 PM or thirty minutes earlier. It’s also a great decision to tell your kids what sites they can or can not access. If they ask, answer them honestly.

Create a Safe Space for Kids via Parental Controls

Teaching kids to make good decisions about online use can only go so far. Any device you have in your home should have parental controls installed. This includes smartphones, laptops, iPads and of course, desk top computers and laptops. Once installed, parental controls can be customized to automatically block sites according to the age of your child. You can also monitor what your kids are doing online.

Effective parental control will also allow you to set usage restrictions according to the time of day. In addition to blocking websites, monitoring social media and filtering content, it can also track location. You may decide to set up rules with your kids to adhere to without setting up blocking features. Leave up to them so make the right decision, but you’ll know if they went online after hours for example, thanks to monitoring. This will help them build self control skills.

Always Communicate with your Kids Regarding their Internet Concerns

Even when you already have set up everything and it’s all going very well and smoothly, encourage your kids to express concerns they may have about their Internet use. Re-enforce why staying away from harmful content is for their own benefit. Slowly give them responsibility to “do the right thing” within the safe confines of your parental control settings.

You can’t protect your children from mature and adult content forever, as well as keeping kids safe from inappropriate YouTube videos. That’s why keeping the lines of communication open is essential to nurture a strong relationship of trust between you and your child. When kids feel listened too, they feel less of a need to rebel from the rules.

Takeaway

Parental supervision is only the start. No parent should feel inadequate for not being able to monitor their child’s activist online all the time. Most computer systems do a good job of preventing virus infections. But malware is much more deviant. It is not uncommon to install a anti-malware program for malware protection, even from innocent website, software programs or video games. The same goes for parental control software which blocks access to the worst parts of the web.

Share This Article

Protecting Yourself Against Email Phishing

email phishing

I will be the first person to tell you to never click a link in an email from a bank or what you think is a legitimate link to any online account you may have.  Whether it be Netflix, Amazon, Fed Ex, PayPal, Capital One or Spotify, the list of companies used by scam artists is endless.

Those sending out phishing emails use trust in these companies to fool us when we least expect it. This is how I came to click on one of those lines, even though I know better.  It happened to me when I had my guard down. More about that in a moment and how you can protect your online accounts and identity.

My story in a moment, but first let’s define exactly what I am talking about.

What is Phishing?

Phishing is a malicious attempt to steal your personal information and gain access to an online account you have with a reputable company. The scammer will send you a fake email that links to a fake login of that company.

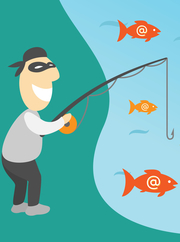
The word phishing is is pronounced like ‘fishing’ and just like when commercial fisherman casts a wide net to catch fish, scammers and hackers send out millions of emails in hopes to catch easy prey who unwittingly click on the links in those emails.

First of all, most online services will never send you a link asking you to sign into your account for any reason. If they do, I’ll explain why you should still not click it and how to access your account safety to see if the email actually came from a legitimate company. In most cases, these malicious emails contain alarming news about your account being compromised, hacked or suspended.

We’ve all seem these emails. They come from hackers and scammers that state “Your Account Has Been Locked” or the message I recently received from Netflix:

“Thanks for choosing Netflix membership! due latest security issues we need you to upgrade your account details in order to continue your membership.”

Notice how there was even a grammatical error in the message, but yes – I still clicked it. I knew full well that if our account had needed changing or was compromised, Netflix is one of those companies that would have emailed a notice and then instructed me to go to their website via usual methods (such as Googling Netflix or using a trusted bookmark you made in your browser). They won’t put the link in the email.

I Knew Better, but I Still Clicked a Phishing Link

In my case, I had just made changes to the WiFi password in our home and this of course would effect Netflix’s ability to connect via the devices that were previously set up using the old password.  Even though I know about phishing and to be careful when receiving these emails, my wife had just mentioned to me that she was unable to connect to Netflix.

At the same time the fake Netflix email arrived in my inbox. I was annoyed that Netflix may not be working so I clicked the link. Fortunately, I realized immediately what I’d done so I closed my browser before any harm was done.

Upon further investigation, I noticed that the link actually was going to a different website than Netflix, but in that moment of frustration it made sense in my mind to be receiving an email from Netflix.

Cyberthieves count on catching people off guard.

Those taking extra precautions to be safe online, such as using only secure public networks or secure websites, can easily be stolen from if not paying attention.   For example, if you don’t have a Chase bank account, then chances are you won’t pay much attention to the email. You know it’s probably fraudulent. But if I do have an account related to the email, it makes sense to be receiving an email about a problem with your account. Especially when you’ve recently logged in your this account and made changes.

For example, imagine that you just shipped a package via FedEx, and later that day a FedEx email comes in stating that your package can’t be shipped. You immediately get stressed… “What?” If you’re not thinking, you will click the link to see what the problem is.

It’s a ‘game of chance’ as hackers send out millions of these emails. They know they will trick some people because by coincidence alone these same people will not only have an account related to the email, some of them will have recently made changes to their account, or shipped a package with UPS, or applied for a loan at a bank.

If there is a legitimate problem with your online account, there will be a notice posted about it after you log in. If all is normal, then you know the email you received is a scam.

Phishing, also known as Spoofing, is very common. If you click the link in a plishing email and you attempt to log into your account, thieves gain access to your user name and password. Once inside the account, they have access to all of your personal information.

Beware of Viruses Coming as Email Attachments

Protecting yourself against phishing is as easy as never clicking a link to an online account from within the email. Always go to your account by typing in the website url in a browser directly.  Or use the bookmark you’ve set up.  Computer infections caused by viruses in email attachments however, are a different story. This is why Anti-Virus software is important to stop spyware, Trojan horses, adware and computer worms. But there are new email virus schemes that employ the same methods as phishing.

You may have see them. These emails contain attachments in the form of a seemingly innocent Word doc or a zip file. The email may say, “Your loan has been approved!” Or “Attached is Your Out Standing Invoice”. If you happened to have just applied for a loan or are curious about if you owe money, you will be more likely to open the attachment.

Invoice Scams are an example of  phishing:  You may you receive a fake invoice from PayPal or another invoicing platform. Usually, the dollar amount is high enough to cause alarm when you receive it, but low enough that it doesn’t look like an obvious scam.

If you’re not expecting an invoice or it’s unknown to you. Don’t click the link. Log into your credit card account from your trusted bookmarks or access the payment platform to see if there are any charges. Chances are, there won’t be.

While phishing emails gain access a single account to access your personal information, viruses via email will activate malware that infects your entire computer. In both cases, your personal information is compromised.

While phishing emails gain access a single account to access your personal information, viruses via email will activate malware that infects your entire computer. In both cases, your personal information is compromised.

If you have accidentally given access to one of your online accounts for any reason or are not sure, log in and change your password as soon as possible.

If you think your computer has been infected by a virus, read more about how to scan and remove malware – as well as protect yourself from attacks.

Protect Yourself Using the SLAM Method

S stands for Sender:

Check to make sure the sender matches the request in an email. If things don’t line up, tread lightly. The email may also be spoofed to look like it’s from a friend or your boss. Or, their email may have been hacked.  If unsure, contact the them by creating a new email from your contacts, see them in person, or call to verify the message.

L stands for Links:

Inspect any link that is contained in any email or text. In emails, you can hover over the link to see the real destination. Pressing and hold the link on a phone will reveal the destination in a popup.  Close the popup without proceeding.  Texts should also be verified. If you know the sender, check with them first to see if they sent you a text with a link. This includes companies.

A stands for Attachments:

Be cautious of all attachments in all emails you receive.  Attachments can be named in a way the seems trustworthy. Verify the sender and if they are familiar to you, check with them first before opening the attachment. Installing anti-virus software will help screen for viruses, but this does not mean you won’t receive attachments that are infected with malware or spyware.

M stands for Message:

Examine all messages you receive via email or text. Check for spelling errors or unusual use of words or phrases. Grammatical errors are common signs of phishing email. Even if everything looks legitimate, check for oddities that seem off. This includes requests for personal information or a topic that doesn’t line up with your personal situation.

How to Stop Phishing Emails

There are things you can do to help stop hackers who send phishing emails.  Virtually every online account service you use will have security departments that investigate phishing. As such, many have email addresses that you can forward these bad emails to for further investigation. When you get a suspicious email, report it for possible phishing.  Simply Google the company name with the word phishing (i.e. ‘Report PayPal Phishing’ or ‘Report Chase Phishing’).  You will often find information about where to send phishing emails and perhaps help these companies catch the cyberthieves.

If you land on a URL that appears to impersonating a legitimate website, report the phishing website to the Google Safe Browsing team.

With new technology, there’s more to educate needed to avoid being scammed:

Read about SMishing and Vishing, as well as Quishing.

Share This Article
Google Safe Search Explore the Safe Search Engine - Google for Kids