Category: Creativity

Copyright vs. Creative Commons: Rights and Flexibility for Creators

A male photography taking a picture of the viewer.

Creators face the dual challenge of protecting their work and sharing it with a wider audience. Copyright and Creative Commons are two distinct but complementary systems. They help artists, photographers, writers, and other creators manage how their work is used and distributed.

Understanding the differences between the two can empower creators to protect their rights while still gaining the visibility they desire.

What is Copyright?

Copyright is a legal tool that grants creators exclusive rights to their original works. This means that when someone produces a creative work, like a photograph, book, or piece of music, they automatically own the copyright to it. This gives them control over how that work is used.

Copyright protects the creator’s work from unauthorized reproduction, distribution, and adaptation. It is the very foundation that supports creators’ ownership of their intellectual property.

For example, if a photographer captures an image, copyright law ensures that no one else can legally use, reproduce, or profit from that image without permission. The creator can also license their work, allowing others to use it under specific conditions, typically for a fee.

This protection gives creators a strong grip on their work, making it easier to earn a living by monetizing their creations. However, copyright comes with a challenge—strict control can limit how widely a work is shared and enjoyed.

The Role of Creative Commons

Creative Commons offers a more flexible alternative for creators who want to allow others to share, use, or adapt their work under certain conditions, without giving up all of their rights. It’s a set of licenses that creators can attach to their work to specify how it can be used.

By choosing a Creative Commons license, a creator still retains copyright but allows others to share their work more freely. But this can only happen as long as the rules of the license are followed.

There are several types of Creative Commons licenses. These licenses range from the most restrictive (which only allows others to share the work as long as they credit the creator and don’t alter or profit from it), to more open licenses that allow commercial use and modifications. These licenses make it easier for creators to build an audience, especially in digital spaces where sharing is necessary for visibility.

For example, a photographer might use a Creative Commons license to allow non-commercial use of their images, as long as they are credited. This can include websites, blogs, or individuals.

The license will state that work can be shared, such as photos, as long as they don’t make money from them. Plus, the user must acknowledge the creator’s work. Meanwhile, the photographer can reserve copyright for other images, keeping stricter control where it matters most, like in commercial contexts.

Balancing Control and Exposure

Hand Stamping Copyright on Paper.
Image by rawpixel.com on Freepik

To recap, Copyright and Creative Commons are both powerful tools. However, they serve different purposes.

Copyright gives creators full control over their work, making it ideal for those who want to safeguard their ability to earn money from their creations.

Creative Commons allows creators to strike a balance between control and exposure, which enables their work to be shared more easily while still retaining some rights.

For many creators, the decision isn’t about choosing one system over the other but finding the right mix.

Some works may benefit from strict copyright protection, especially those intended for commercial purposes. Others may benefit from the visibility that comes with a more open Creative Commons license, particularly in cases where sharing can lead to greater recognition or further opportunities.

Global Considerations

While copyright laws vary by country, Creative Commons offers a consistent framework that operates globally, making it easier for creators and users to navigate across borders. It’s important for creators and users to understand the specific rules of each license and the legal requirements of the country they’re operating in.

By understanding how to use both systems, creators can find the right balance between protection and exposure, ensuring their work reaches the right audience while safeguarding their rights.

Share This Article

Why the Best Custom Diamond Painting is the Best Gift

Painting of Cute Puppy Dog with Big Eyes

Diamond art kits offer a unique opportunity to create stunning, personalized paintings that make for thoughtful and memorable gifts. Whether you choose to gift a completed painting or share the experience of creating one, diamond art kits provide a meaningful and creative way to show someone you care.

To make this experience even more special, you can opt for the best custom diamond painting. This option allows you to transform one of your cherished photos into a dazzling piece of art. This art is an opportunity to learn new skills, connect emotionally with your chosen image, and create something truly personal. The emotional value and sense of accomplishment make custom diamond paintings a standout gift, offering benefits that go beyond the ordinary.

We enjoyed delving into the many reasons why custom diamond paintings are the perfect personalized gift.  And now, we’re existing to show you how they bring joy to both the giver and receiver.

What Are Custom Diamond Paintings?

Example 2: Custom Diamond Paintings

Diamond paintings are a type of art you can create with a canvas and ‘diamonds’. These diamonds are actually drills of resin rhinestones of different colors. Using the instructions on the canvas, you will glue the diamonds down in the form of a mosaic.

Therefore, custom diamond paintings are a mosaic of a unique image you want. When you submit a picture to a diamond art company, they will print a canvas and send you a matching diamond art kit. Then, you will be able to make a mosaic of your photographs and give away the final art piece. Alternatively, you can give the art kit as a gift and let the recipient have fun putting it together.

The Best Qualities of Custom Diamond Paintings

When you want to give a unique gift, diamond paintings are an excellent option. To understand why it is such a good option, you only need to consider its qualities.

Diamond paintings have the following qualities:

1.    Creates a Long-lasting Memory

The first reason why you should give away custom diamond paintings is that they give a lasting memory. Since you can select any of your own pictures, such as vacation photographs, these paintings are meaningful. So, you and the person you are giving it to will be able to remember the memory depicted in the mosaic. Plus, the recipient will fondly remember the process of putting it together if you give this gift as a diamond art kit.

2.    Improves Manual and Discernible Skills

These paintings will allow you or the recipient to improve your manual and observant skills. In particular, children benefit from putting together these paintings. This is because this activity promotes hand-eye coordination. It give them an appreciation for art and also requires the child to practice recognizing shapes and reproducing them.

Closeup of hand doing diamond painting.

3.    Evokes Powerful Emotions

These paintings are striking in their beauty. So, when you give them away as a gift, the recipient may be touched by the artistic mosaic. They may also feel captivated and awaken a desire to create art of their own. For children in particular, the fun and bright colors can prompt them to be more creative.

4.    Reduces Stress

Another reason why you should consider these paintings as your first personalized gift option is that they reduce stress. Since you can paint with diamonds in a quiet and peaceful environment, it can be calming. Since it requires focus, it can help you enter a mindful state of mind that can be therapeutic. Moreover, the repetitive motion of placing the diamonds may let you decompress.

5.    Improves Focus

This personalized gift is perfect for those who need to improve their focus. Handling the small diamonds requires focus, so you will naturally start thinking only of this task. For children, this can lead to over 10 hours of dedicated, focused activity. Broken down into creative sessions, you may be able to focus your child on this activity for several days.

6.    Transforms Keepsakes into Art

These diamond paintings will transform your keepsake photographs into works of art. While you could turn the original image into a framed photograph, using it to create a diamond painting heightens its value. In fact, the recipient of this gift may even prefer it since it can be an interesting piece of art they can add to their home decor.

7.    Suits Various Occasions

Finally, custom diamond paintings are perfect for a variety of occasions. Whether you want to give a diamond painting gift for a birthday, religious holiday, or another occasion, its customization feature allows you to make it fit the occasion. For instance, if you want to celebrate the holiday, you can use a picture you took during that season.

Where to Get Custom Diamond Paintings

Example 2: Custom Diamond Paintings

To find the best diamond art kits, you should visit Dreamer Designers. Their diamond art kits have a high-quality canvas, allowing you to create detailed paintings that will not crease. Moreover, their colorful diamonds are made of eco-friendly resin. Also, you can supplement the kit by adding more tools to make the painting process easier and faster.

Plus, they have an Uh-Oh insurance policy. So, if your child spills the diamonds, they will replace the diamonds at zero cost to you. You will simply need to take a picture of the mess and submit a claim. Within a day, the company will reach out to you to resolve the situation.

Conclusion

Custom diamond paintings are the best personalized gift you can offer someone, no matter the occasion. This gift is meaningful not only because of its uniqueness and personal nature but also because of its stunning appearance. These mosaics shine with bright colors which enchant both children and adults. In addition, these paintings act as keepsakes that offer you a chance to practice manual and cognitive skills, reduce stress, and increase focus.

To offer this spectacular gift, you should consider buying a custom kit from a highly-rated diamond kit producer such as Dreamer Designs. Their high-quality kits and customization features create the best diamond painting gifts.

Share This Article

DIY Glow-in-the-Dark Crafts Any Kid Will Love

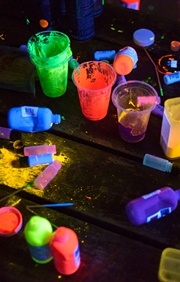
Colorful paint mixes on crafting table.

Are your kids ready for a craft adventure that lights up their creativity? DIY glow-in-the-dark crafts are the perfect way to add a touch of magic to any project. Whether you’re planning a classroom Halloween party or just looking for fun activities to do at home, these glowing crafts will captivate children and adults alike.

Glowing Night Sky Jars

Transform ordinary mason jars into dazzling night sky jars that light up any room. Start by coating the inside of the jar with glow-in-the-dark paint. You can create stars, moons, or any other celestial shapes. Once the paint dries, place a small LED light inside the jar. When the lights go out, the jar will emit a soft, glowing light that mimics a starry night sky. These jars make great nightlights and are a wonderful addition to any child’s room.

Glow-in-the-Dark Slime

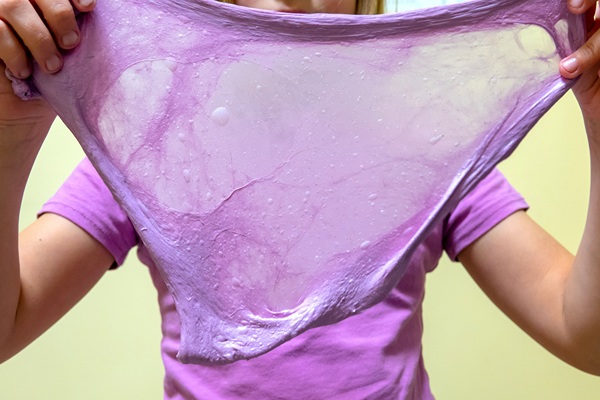
Slime is a favorite among kids, and adding a glow-in-the-dark twist makes it even more exciting. To make your own glowing slime, mix glue, baking soda, and contact lens solution.  After you have that incorporated, stir in some glow-in-the-dark powder or paint. The result is a stretchy, squishy slime that glows brilliantly in the dark. This slime is perfect for a fun weekend activity at home. Kids will love playing with it and watching it glow.

Glow in the dark purple slime stretched out.

Glow-in-the-Dark Rock Painting

Rock painting is a simple yet enjoyable activity for kids of all ages. Collect some smooth rocks and clean them thoroughly. Once dry, paint the rocks with glow-in-the-dark paint. Kids can create various designs, from spooky Halloween themes to cute animals.

Fun Rock Painting Activity

After the rocks are dry, scatter them around the yard and have the kids search for them when the sun goes down. It’s a fun scavenger hunt the children will love.

Glowing Bracelets and Necklaces

Jewelry making gets a glowing upgrade with these fun crafts. Use glow-in-the-dark beads, strings, and charms to create bracelets and necklaces that kids can wear in the dark. This activity is perfect for a classroom Halloween party or a sleepover, adding an extra fun element to the event. The glowing jewelry pieces will be a hit among the kids, and they can proudly wear their creations.

Create Glowing Stickers

Adding a glow-in-the-dark element to stickers makes decorating even more fun. Purchase some blank stickers from Jukeboxprint or other vendors and glow-in-the-dark markers or paint. Kids can draw their designs on the stickers, then cut them out and place them on walls, notebooks, or any other surface. The stickers will charge in the light and glow in the dark, creating a magical effect that kids will love.

Glow-in-the-Dark Posters

Poster-making becomes more exciting with glow-in-the-dark markers and paint. Kids can create posters for their room, a school project, or even as gifts for friends. The glow-in-the-dark elements add an extra layer of excitement, making their posters stand out in the dark. This activity is the perfect way to add glow-in-the-dark to any project.

DIY glow-in-the-dark kids crafts offer endless opportunities for creativity and fun. These glowing projects will delight kids of any age. There’s something for every child to enjoy. Always supervise the crafting process to ensure a safe and enjoyable experience.

Are you ready to light up your crafts? Try out these glow-in-the-dark projects and watch your kids’ faces light up with excitement.

Happy crafting!

Share This Article

How to Build a Roof for Stargazing with Kids

Bright starts in the night sky.

Embarking on a stargazing adventure with kids can be an exciting and educational experience. Building a dedicated space for night sky exploration adds an element of magic and fosters a lifelong appreciation for astronomy. Creating a simple roll-off roof structure provides an accessible way for families to observe the stars together.

Begin by choosing the right location, ideally a spot with minimal light pollution and an unobstructed view of the sky. Gathering appropriate materials is essential to ensure the stability and functionality of the roof. Using easy-to-follow designs can simplify the process and make it enjoyable for everyone involved.

Having an equipped space enhances the stargazing experience by allowing for the convenient setup of telescopes and other gear. Integrating educational resources and activities engages children’s curiosity, making each session memorable and informative. Share this unique experience and inspire a deeper interest in the wonders of the universe.

Understanding Basic Roof Construction

Building a roof for stargazing involves selecting appropriate materials and ensuring safety, especially when kids are involved. This requires attention to detail to ensure that the structure is stable, secure, and family-friendly.

Choosing the Right Building Materials

Selecting suitable materials is crucial for constructing a durable and effective stargazing roof. Wood, metal, and polycarbonate are common materials used for roof construction.

Pinnacle Home Improvements tells us that wood is often preferred for its aesthetic and insulating properties but may require protection from weathering. Metal roofs, such as those made from aluminum or steel, offer durability and strength, with excellent resistance to various weather conditions. Meanwhile, polycarbonate is lightweight and allows light passage, making it an excellent option for certain designs.

Materials should also be easy to source and manage, especially when engaging young helpers. Considering the local climate will help in deciding whether more insulation or waterproofing might be necessary. Ensuring compatibility between materials used for the frame and the roof itself can prevent future issues.

Safety Considerations for Families

Safety is a top priority when building a roof suitable for families, especially with children involved in the project. Protective gear like helmets and gloves should be worn by all participants to minimize potential injuries.

Construction should focus on creating a structure without sharp edges or unstable parts. Weatherstripping extensions and covered nails can prevent injuries from unforeseen protrusions. Additionally, the foundation must be secure to support both kids and adults. Clear, simple instructions are vital when involving young family members, and tasks should be age-appropriate to maintain safety without sacrificing involvement.

Regular maintenance checks can identify and rectify any hazards promptly. Consider incorporating child-proof locks or security measures on areas that should remain off-limits when unsupervised.

Designing a Stargazing Roof with Kids

Telescope pointing to the stars through an open roof

When creating a stargazing roof with kids, it’s important to consider their safety and engagement. Incorporating features that are both functional and exciting can transform the experience into a memorable learning opportunity. Selecting a theme can spark interest and further enhance the joy of stargazing.

Incorporating Child-Friendly Features

Designing a safe and fun environment is crucial when building a stargazing roof with children. Safety rails can be installed to prevent falls, and non-slip surfaces help reduce the risk of accidents. It’s advisable to use soft cushioning materials in areas where children might sit or lean.

Interactive elements like easy-to-read star charts or rotating panels with constellations can make observation sessions engaging. Providing simple telescopes designed for children encourages active participation and learning. These features ensure that the roof not only fits the purpose of stargazing but is also a secure and enjoyable space for young explorers.

Selecting a Theme for Engagement

Choosing a theme can significantly enhance a child’s interest in stargazing. A space-themed design with glow-in-the-dark stars on the roof can make the experience magical. Themes inspired by popular space-related cartoons or movies could also resonate well with younger audiences.

Themed decorations and accessories, such as planet models or galaxy murals, add an educational element. Including a storytelling corner with books about space adventures can inspire curiosity and creativity. Creating a narrative can turn stargazing into a captivating journey, encouraging children to learn while having fun.

By tailoring the roof design to accommodate these elements, the experience becomes both educational and enjoyable.

Building the Stargazing Roof

Creating a stargazing roof that is safe and functional involves understanding the construction site preparation and following a detailed building process. This ensures a sturdy structure suitable for both small and large telescopes.

Preparing the Construction Site

Before starting construction, selecting the right location is crucial. The site should be clear of obstructions like tall trees or buildings to provide an unobstructed view of the sky. Ensuring the ground is level is essential to maintain the stability of the roof.

The foundation requires careful planning. Digging about 1-2 feet deep and adding a gravel base for drainage is recommended to prevent moisture damage. Using thick-treated lumber or concrete can provide a durable and stable base. It helps to verify that the ground is level with high-quality tools such as a spirit level.

For families looking to undertake larger-scale backyard projects like this, roof financing can help make the vision more accessible. With flexible repayment plans, homeowners can upgrade their outdoor spaces, whether for stargazing, play, or learning, without the financial strain of a large upfront cost.

Step-by-Step Construction Process

Creating the frame involves precise measurements and materials. Many builders use 2x4s for framing, while larger beams like 2x6s can support additional weight. For a roll-off roof design, consider using a 2×6 cross beam and additional supports such as angle braces to ensure stability.

Establishing an easy-to-operate roof mechanism, such as sliding rails or hinges, can simplify the process of opening and closing the roof. Weatherproofing materials protect the interior and keep equipment safe from the elements. Ensuring clean alignments during the build will improve both the roof’s functionality and longevity.

Enjoying Your New Stargazing Roof

A stargazing roof offers families a special place to explore the night sky. To make the most of this experience, it’s important to plan engaging activities and maintain the space effectively over time.

Organizing a Family Stargazing Night

To create a memorable stargazing night with your family, consider setting up a schedule to identify key celestial events like meteor showers or planet alignments. Websites and astronomy apps can help in planning these events.

Gather necessary equipment such as a telescope or binoculars. Comfort items like blankets, pillows, and seating can enhance the experience. Keep snacks and drinks handy to make the outing relaxing and enjoyable. Use these opportunities to teach children about the stars, planets, and other celestial bodies.

To engage everyone, prepare a list of constellations or stars to find. Turning this into a friendly competition can make the night both educational and fun. Encourage children to ask questions and share what they see.

Maintenance and Upkeep Tips

Maintaining your stargazing roof ensures it remains a safe and enjoyable space. Regularly check for loose or damaged materials, particularly if the roof has moving parts like a roll-off structure. Ensuring that the roof remains watertight and weather-resistant is crucial to protect both the structure and any equipment stored there.

Frequently clean the space to remove debris that may have accumulated and inspect equipment like telescopes and binoculars. Ensure they are stored in a secure, weatherproof location to prevent damage.

Involving the whole family in maintenance tasks teaches responsibility and makes caring for the stargazing area a shared activity. Keep a checklist of maintenance tasks and schedule regular times to address them, making upkeep a routine part of your stargazing adventures.

Share This Article